
Vast Multisite networks like WordPress.com and Edublogs help their users to find great new content and communicate with each other by linking them up as a community.
There are a few options you have for this, which will depend on the nature of your network and the needs of your users. Some of these can be added as your network grows while others will need to be set up from the start.
This is the fifth post in our six-part WordPress Multisite masterclass series. In this series, you’ll learn everything you need to know to create your own network, add sites to it or let users add their own, and manage the network. You’ll learn how to ensure your network is secure and high performing and how to create a successful community of users and sites.
In this tutorial, you’ll learn about:
- Creating a social network on your main site with the option for users to create their own blogs.
- Letting users view each other’s content in their dashboard and display their favorite content from around the network on their own site.
- Displaying the latest or featured content from around the network (including posts and comments) on your main site, encouraging visitors to browse other sites in your network.
- Displaying the latest or featured content from around the network on other sites in the network.
- Letting your users connect directly with each other by making friends via their dashboard.
It’s unlikely you’ll want to do all this, so it makes sense to put some time into planning your community first and identifying what your users need and what you’ll need to provide.
Let’s get started.
Multisite Networks as Communities: Real World Examples
The two largest Multisite networks in the world are also communities of users and readers. Both WordPress.com and Edublogs encourage users to follow each other and consume each others’ content.
If you’re a WordPress.com user, or you’ve activated the new Calypso admin system on your self-hosted WordPress site, you’ll have access to the Reader, where you can read new content from the blogs you follow:

And Edublogs also has its own Reader in the backend, which lets you see the latest content from your favorite blogs on the network:

In this tutorial, I’ll show you how to use some of WPMU DEV’s plugins that power Edublogs’ community features so you can set up a community of your own.
Identifying Your Community’s Needs
Before you set up your community and decide which plugins you’ll need to use, you need to work out what your community needs and how it will operate. Ask yourself the following questions:
- Will user interaction be on the main site, or via the dashboard of their own sites?
- Will users need to create events, groups etc. to support community activity?
- Will users want to easily access each others’ site content?
- Will users want to share each others’ content?
- Will users need to have social interactions involving posts, comments, and discussions?
- What content will you display or share on your main site? How much will be public and how much private to users of the network?
The answers to these questions will determine the extent to which your network comes under one or more of three headings: social interactions, consuming content, and sharing content. You’ll probably have one of these as your main focus, maybe with one or two others as secondary areas.
For example:
- A network whose primary aim is to enable the creation of blogs (like Edublogs or WordPress.com) will focus on that, and add the sharing of content created in those blogs and any social aspects as a feature in the front-end and backend.
- A site focused on creating a social community will focus on making that work well on the main site, with the added extra of letting users create their own site. BuddyPress might be the most important component of a site like this.
- If you want to let potential users sample the content created in your network, you’ll focus on plugins that let you share content from around the network on the front end of your site, so the public can read it.
Let’s look at each of these aspects in detail.
Consuming Content from Across the Network
Edublogs and WordPress.com both let their users see the latest content from around the network in their dashboard. This means that every time a user logs in, they get to see what other people have been posting. This encourages people to browse the network and consume content as well as to post new content themselves in the hope that others will follow them.
Let’s take a look at how you can set this up on your network using the Reader plugin.
Before You Start: Installing Post Indexer
Before installing any of our plugins for sharing and consuming content across your network, you’ll need to install and network activate the Post Indexer plugin. This is necessary for plugins such as Reader, Recent Global Posts and Recent Global Comments (which we’ll look at shortly) to work.

Install the Post Indexer plugin using the WPMU DEV dashboard in your site. Make sure it’s network activated. You don’t need to do any configuration of this plugin, it will automatically work for you.
Installing and Configuring the Reader Plugin
Next, install and activate the Reader plugin via the WPMU DEV dashboard and network activate it.
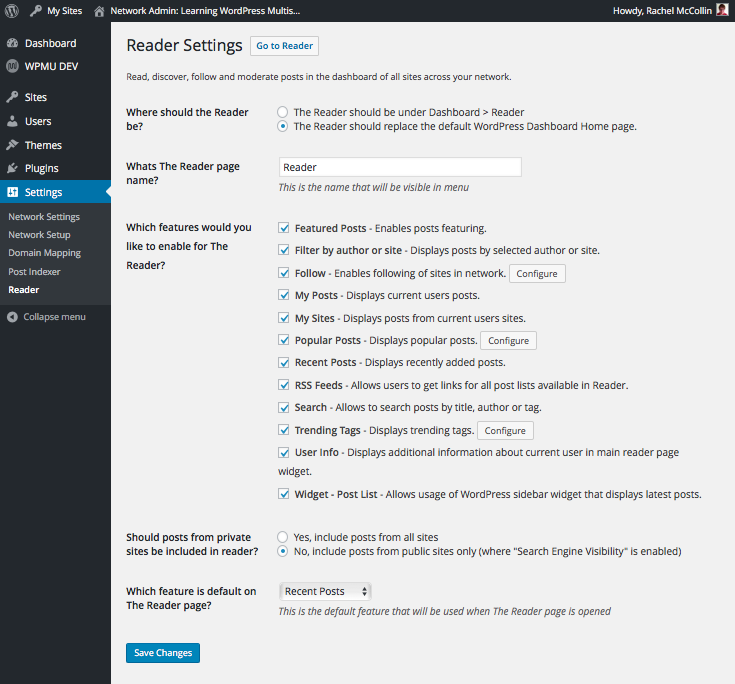
To configure the settings for the plugin, in your network admin screens go to Settings > Reader:

Here you can specify how the Reader will work for your users. In the first section, Where should the Reader be?, select The Reader should replace the default WordPress Dashboard Home page. Then select those aspects of the Reader you want to enable from the list beneath.
Click the Save Changes button to save your settings.
Once you’ve done this, switch to the dashboard for one of the sites you manage. Here’s mine for my main site:

You should already be following your own site by default. Recent posts from that site will be displayed. If nothing is showing up yet, create some posts!
Following Other Sites on the Network
Users of your network, whether they’re site admins or not, can follow other sites on the network. The content from those sites will then appear on the dashboard.
To find sites to follow, you can do a search for the title of a post, its tag or its author. From your Reader screen, type a search term in the search field at the top right, select what you want to search through (title, author or tag), and click the search button. You’ll see all posts that fit your search terms:

You can then view those posts by clicking on them or follow the blogs they’re on by clicking the Follow button below each post in the search results screen.
The blog you’ve followed will then show up in your Reader screen:

Users can also find sites to follow if you share featured or latest content on your main site. They simply click through to the content, then click the Follow icon in the admin bar when viewing the site. You’ll learn how to share content on your main site in the next section.
Sharing Content From Across the Network
As well as reading content from your network in the dashboard, you and your users can also share content from around the network on the front-end of your sites. There are a few ways to do this:
- Share content that you’re following via the Reader, using the widget provided by the Reader plugin.
- Use a shortcode to share posts on a page in your main site, with the Recent Global Posts plugin.
- Use a widget to share posts in your sidebar or footer, with the Recent Global Posts Widget plugin.
- Add a comments widget to your sidebar or footer with the Recent Comments Widget plugin.
- Use the Live Stream Widget plugin to display a live stream of latest content from your network in any widget area.
As you can see, there are plenty of options. Most of these can just be added to the main site, except the Reader widget. Instead of working through each of these plugins in turn, I’m going to show you two things:
- How to create a page in your main site that showcases recent content.
- How to add recent content to widget areas in a site in your network.
Before You Start: Installing Post Indexer
If you haven’t already done so, install and network activate the Post Indexer plugin – see instructions in the previous section.
Creating a Recent Content Page On Your Main Site
A great way to encourage people to sign up to your network and become part of the community is by showcasing the latest content from around your network on your main site. For example, WordPress.com has a Discover page where you can read some of the best new content created by its users:

So let’s set one up on the main site in our network. To do this, you’ll need the Recent Global Posts plugin installed and activated.
Setting Up Your Page
Now navigate to the site admin screens for your main site. Create a new page and call it Latest Content (or whatever you want to call it!)
Type in some content to entice visitors and tell them what them the page is about. Then type in [globalrecentposts]. This is a shortcode – the plugin will use it to populate the page with the most recent posts from around your network.
Here’s my page in the editing screen:

Publish your page and view it in the front end. Here’s mine:

Note: The eagle-eyed among you will notice that I’ve added a login widget to the sidebar of my main site. This gives users an easy way to login if they can’t remember how to access their login page. I used the Login Widget with Shortcode plugin to do this.
That includes some great content but it doesn’t really entice you in. Luckily the recent posts shortcode has some parameters you can use to provide more information. To use one or more of these, type them into the square brackets with the shortcode:
- number=”5″: How many posts you want to display
- title_characters=”250″: Maximum number of characters in each title.
- content_characters=”200″: Maximum number of characters in the content of each entry
- title_content_divider=”-“: What to use to separate the title from the content. If this parameter is not included, the content will display beneath the title.
- title_link=”no”: By default, the title links to the post. You can use this to remove the link.
- show_avatars=”yes”: Displays the author avatar if avatars are used on your site.
- avatar_size=”32″: Sets the square size of the avatars.
- posttype=”post-type”: Use to specify the post type to display. Default is “post”. Note that you can only specify one post-type.
The values in the examples above are just that: examples. You provide your own values.
In this case I want to add avatars and an excerpt of the post. To do this, replace [globalrecentposts] with [globalrecentposts content_characters=”250″ show_avatars=”yes” avatar_size=”40″ ].
Save your page. It will now look something like this:

That looks a bit more enticing! Now let’s add a link to encourage people to sign up. Add some text below your recent posts shortcode, inside a link to the sign up page at wp-signup.php, that you created in Part 3 of this course.
To do that, type the text into your page editing screen, click the link icon and paste in the URL of your signup page:

As well as that, add a link to this Latest Content page to your main navigation.
Now here’s the final version of my new page:

If you want to entice readers in even more effectively, I’d advise using some styling in your theme to make that signup link more prominent and maybe to make the posts stand out from each other a bit more, as well as removing the bullet points. But that’s outside of the scope of this course so I’ll leave it to you!
Sharing Content on Sites Using the Reader Widget
If you’ve installed the Reader plugin, your site admins can add its widget to their site to show people what they’re following around the network.
You can do this via the Widgets screen or the Customizer. Let’s use the Customizer.
Go to Appearance > Customize and select Widgets. Then select the widget area you want to work with – I’m selecting Sidebar:

Click the Add a Widget button and then select the Reader: Recent Posts widget. Fill out the Title field, select how many posts you want to display and the other options for display, such as post date, excerpt, and author.
You can also select what kind of posts you want to display: featured posts, posts from sites you’re following, your own posts, posts from all the sites you have on the network, popular posts from around the network, or latest posts from around the network. I’m selecting Following:

Once you’ve done that, click Save & Publish then check out the widget on your front-end:

You can also use the widget to show the latest content from around the network or your own posts, so you might want to use it multiple times in one or more widget areas.
Creating a Social Network
Creating a community on your network is also about adding elements of social interaction. If you need your main site to function as a full-blown social network, you can install BuddyPress, but if you don’t need all of the functionality of BuddyPress, you can use the Friends plugin to allow members to make connections and the Messaging plugin to let them send each other messages. You’ll also find it helps your users if you let them upload their own avatar without using Gravatar. To do this, you can use the WP User Avatar plugin.
Let’s look at both of these.
Allowing Avatar Upload by Users
Most people don’t have an account on Gravatar and your users may not want to set one up. So you can install the WP User Avatar plugin to let your users add their own profile picture from their Profile screen.
Install the plugin on your network (from the plugin directory) and network activate it in the normal way.
To upload an image, a user goes to Users > Your Profile. Scroll down to the Image field (which is quite a way below the Profile Picture field, slightly confusingly):
Click the Choose Image button and upload your new image using the image uploader:
Finally, click Update Profile and your profile image will change, as you can see here from the front-end of the site:
Letting Users Connect with Each Other
To let your users connect with each other, install the Friends plugin via the WPMU DEV dashboard and network activate it. If you want to let them send each other messages too, install the Messaging plugin and network activate that too.
Then, configure it by going to Friends Settings in your network admin menu. Here you can edit the email templates the plugin uses to notify people that other members want to connect:

Make any changes you want to, then click the Save Changes button. You’ll need to click Save Changes for each of the their templates, not just once on the screen.
To send a friend request, your users go to Friends > Find Friends in their admin menu. Type in the username, display name or email address of someone you want to make friends with and click Search:

Then click the Add link next to their image.
The person you’ve sent the friend request to will receive an email alerting them. When they log in to their site, they can go to Friends > Friend Requests to see new requests:

You can check out their site first by clicking the View Blog link, approve the friend request or reject it. The person sending the request will get an email to let them know your response.
Now when either of you go to the Friends screen, you’ll see the other person listed:

Users can then send each other messages by clicking the Send Message link:

Just type in the message, click Send and the other user will get an email notifying them. You can use all of the same formatting options for your message as you would in a post.
To see incoming messages, go to Inbox in your admin menu:

You can also send messages from this section of the admin menu, as well as from the friends screens.
Creating a Community Will Enhance Your Network
Adding community features to your Multisite network gives your users something more than just a way to create sites. They can also consume their favorite content, share it with others and connect directly with other users.
You can also use community features to showcase what’s going on around your network in the main site and demonstrate why your network is so great.
Creating a community makes the network that much more valuable for your users and will help them get more from it.
Missed a tutorial in our Multisite masterclass series? You can catch up on all six posts here:
- WordPress Multisite Masterclass: Getting Started
- WordPress Multisite Masterclass: Activation and Configuration
- WordPress Multisite Masterclass: Site and User Creation
- WordPress Multisite Masterclass: Client Sites and Domain Mapping
- WordPress Multisite Masterclass: Creating a Community
- WordPress Multisite Masterclass: Managing Your Network
Did you find this tutorial helpful? Why do you want to learn about WordPress Multisite? What do you want to know more about? Let us know in the comments below.